Sending SMS Messages
Vantage includes the built-in functionality for sending SMS messages to mobile phones.
Please be aware there are additional charges for this service.
Purchasing SMS Credits
In order to send SMS messages within Vantage, you will first need to top up SMS credits on your account. The easiest way to do this, and to quickly check your balance, is to add the SMS BalanceCredits widget to your dashboard.
To do this, first switch to the dashboard panel:panel. It has this icon:


Click
to switch to your dashboard. If you haven't set up your dashboard before, it will be an empty grey area:
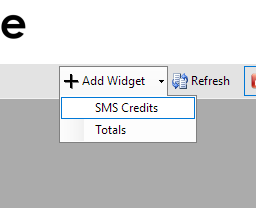
To editadd yourthe users,SMS Credits widget, click the 'Tools''Add menuWidget' button and choose 'Users'.'SMS Credits':
The editorSMS windowCredits widget will appear on your dashboard, which looks like this:
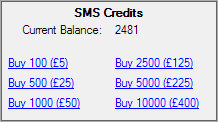
OnAt the lefttop side,of the widget, you can see theyour usercurrent groups.balance. TheseIf you haven't bought SMS credits before, this is probably zero. Below, you can see options for buying various quantities of SMS credits. There are usedper-credit discounts for higher volumes.
When you click one of the purchase links, you'll get a confirmation window:
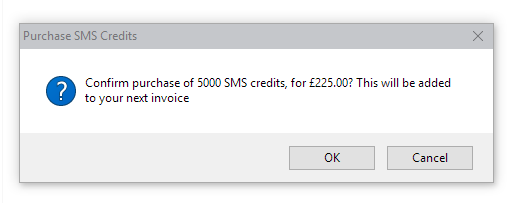
Click OK to groupaccept usersthe intopurchase. logicalThe divisions,amount butwill havebe noadded effectto your next invoice. The balance indicated on the Vantagewidget andshould areupdate immediately. If it does not usedupdate to controlreflect permissions.your Youpurchase, canplease add,contact editVecsoft andSupport.
Sending removeSMS userMessages
To groupssend usingSMS messages, switch to the 'Messaging' panel. Then, click 'Send Message' in the toolbar buttonsand aboveselect the'Send list.Text Message'. A new message window will open:
On
To send a simple message to a single number, enter the rightnumber side,in the box next to 'Phone', type your message in the large space below, and click 'Send'.
Whilst you willare typing your message, you can see a hint at the bottom which shows you how many credits your message will take to send.
Sending to many recipients at once
If you need to send messages to many recipients at once, you can create a text file that contains a large list of usersnumbers. Then, click the icon in theline currentlywith selected'Add group. These can also be added, editedrecipient' and removedselect using the toolbar buttons above'File':
Creating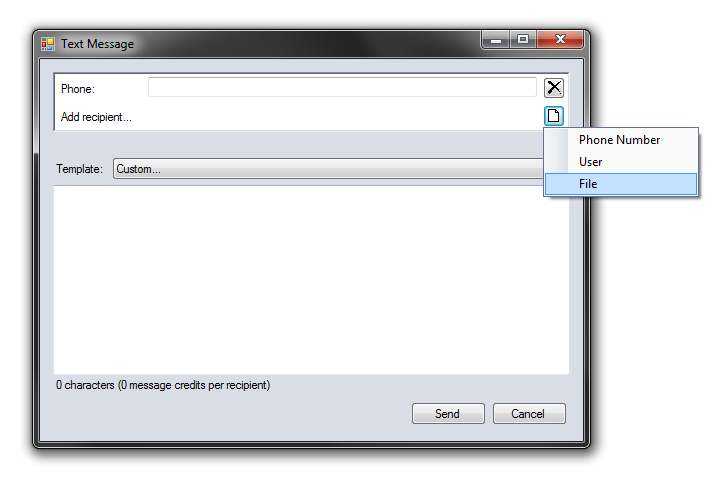
Locate athe Newfile Userthat contains the phone numbers. Vantage will
To create a new user, first select the group into which you want the user to be placed, thenclick the 'New User...' toolbar button. The user properties window looks like this:
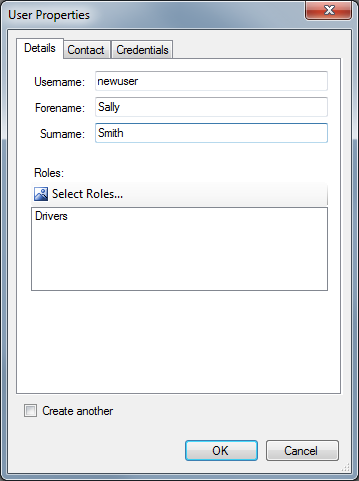
A username must be entered, and should not contain any spaces or special characters. Upper or lower case letters make no difference. This is the username that the user will use when logging in to Vantage.
The user's real name is optional, but it is recommended to enter at least a forename, as this is used for display purposes in some views within Vantage.
Click the 'Select Roles...' button to choose which roles this user will have. The permissions that the user has will be a combination of the permissions provided by all the roles to which they belong.
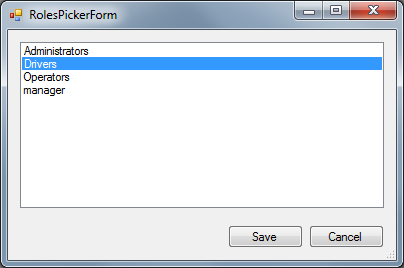
You can select more than one role using the standard Windows shortcut keys (Shift for range, CTRL to pick individually).
The credentials tab allows you to specify the methods the user can use to log in.

If the user will need to use the till, or any administrative functions of Vantage, they will need to be able to log in using a username and password. To do this, check the 'Enable password authentication' check box and enter a password into the text box below.
If the user will need to log in using a barcode scanner, typically for delivery drivers, check the 'Enable barcode scanner authentication' check box and type the barcode value in the text box below.
The 'Trust' options control how much Vantage will trust the user's authentication. Most tasks are unaffected by this setting, but some very sensitive operations, such as voiding orders, may require full trust. You may want to specify that certain authentication methods, such as barcode authentication, are not sufficient for these operations.
Roles & Permissions
To control user roles and permissions, click the second tab at the top of the editor window. The roles editor looks like this:
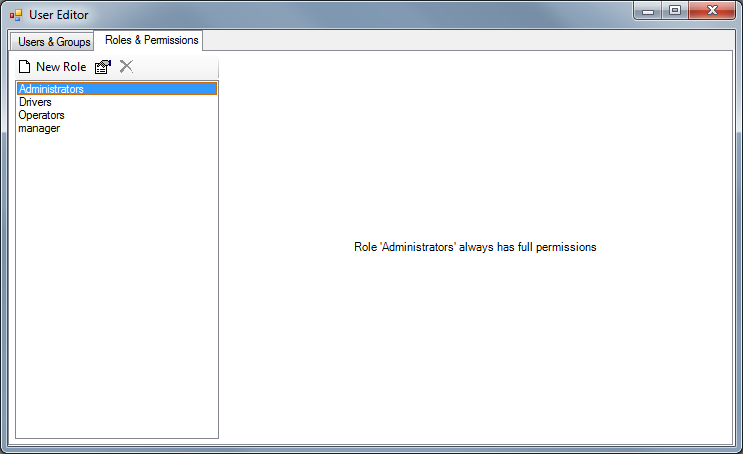
The list on the left shows the created roles. You can add, edit and remove roles using the toolbar buttons above the list. Select a role to view its permissions
The 'Administrators' role is built-in to Vantage, and cannot be deleted. Any user with the 'Administrators' is always granted permission for any action. It is recommended that you reserve this role for use only with users who are responsible for overall control of the system. Other roles display the permissions tree:
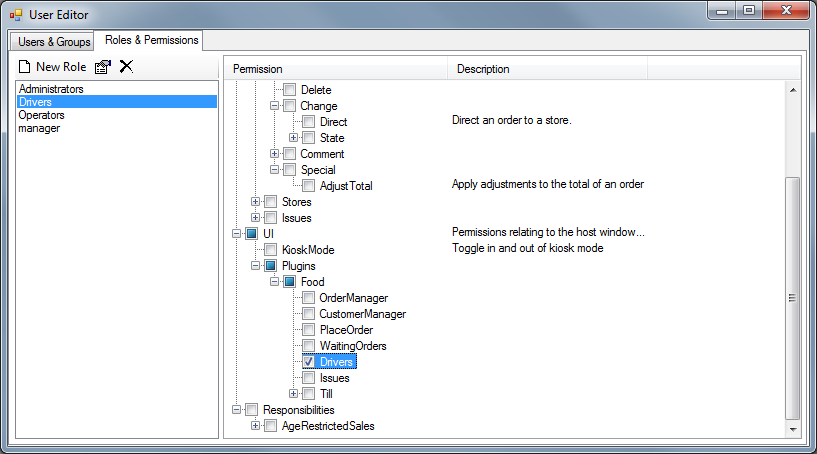
Permissions in Vantage are hierachical - if you have any permission, you automatically have all of the sub-permissions. This makes it quicker and easier to assign large sets of permissions in one go, with finer control still available if it is needed.
If a permission is ticked, any user with the role will have that permission. If it is not ticked, this role will not grant a user that permission, but they may still gain that permission from a different role. The 'solid square' in the check box indicates that the user does not have that entire branch of permissions, but does have at least one of the sub-permissions within.